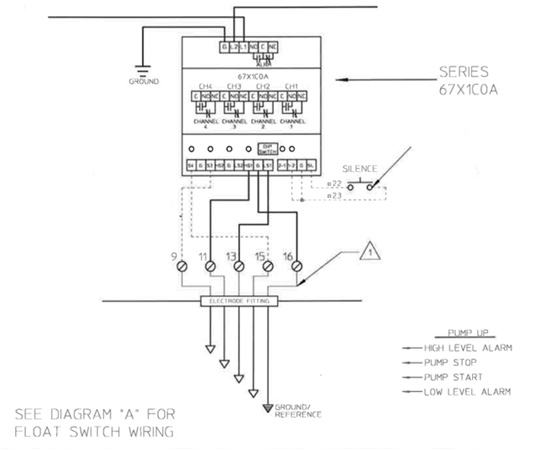
CP Series 67 Simplex Pump Up

The below diagrams explain how to connect your sensor wires up to the CP Series Control Panel when you have a CP Series 67 Simplex Pump Up, option A2. It will show you how to connect probe sensors or float switch sensors. The diagram will explain how to connect your power and load side as well.
Probe Wires: The below diagram shows where to connect your high level, pump start, pump stop, low level, and reference probe to.

Float Switch Wires: If using dry contact float switches, then refer to the below diagram. Make sure your floats are Normally Open, when in the dry position, to ensure the relay logic works correctly.
 DIP Switch Settings: Ensure the DIP switch settings match the below so the relay logic is correct. ‘D’ is for Direct Mode and ‘I’ is for Inverse Mode. The most left two switches, 3 and 4, are for the remote alarm load contacts, and whether you want channels 3 or 4 (both, one, or neither) to trigger these contacts.

Power and Load: Bring your 120 VAC supply to terminals 1 and 2. Terminals 3-6 are isolated load contacts and must be wired in series with its load and that series branch circuit connected across a power source compatible with the load. Connect your pump motor starter to terminals 3 and 4. High level alarm to terminals 5 and 6. Low level alarm to terminals 7 and 8.
Refer to the Instruction Bulletin for further installation instructions.
 SEARCH OUR RESOURCE CENTER
