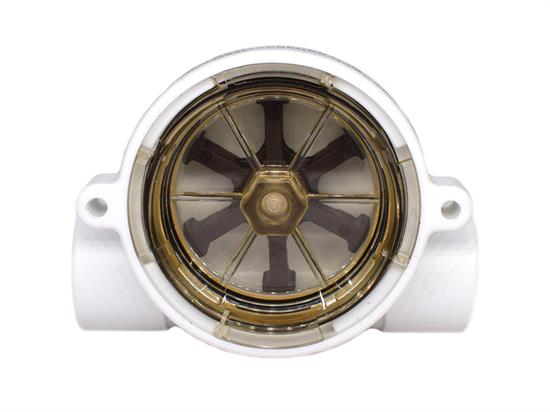
RotorFlow® Installation and Maintenance
A proper installation will enhance RotorFlow® sensor performance. Install using standard pipe fitting tools; horizontal fluid lines are recommended. For further installation and maintenance recommendations, refer to one of the following instruction
bulletins: RFO Types-Part Number 157258; RFI Types-Part Number 157259; RFS Types-Part Number 157261.
Since their function is to monitor dynamic fluid flow, naturally the rotor will react to turbulence, pulsation, entrained air, and other flow anomalies included in the flow stream by other process hardware. For optimum performance, install RotorFlow® units
where nominal flow conditions exist with ports located at the top. Incoming flow may be placed to either port; a minimum of 8 inches (20 cm) of straight pipe on the inlet side is required. When operating in the low flow range, the supplied Low Flow
Adapter must be installed in the incoming port.

Except for straight-thread versions, RotorFlow® sensors connect to a piping via NPT mating thread forms. The use of an appropriate thread sealant is necessary to assure a leak-tight connection. Permatex "No More Leaks®" or 2 wraps of Teflon® tape
are the only sealants recommended for Gems Sensors & Controls flow sensors. Straight-thread versions are an O-ring for sealing.
150 micron filtration is recommended. However, should foreign particles enter the RotorFlow® sensor, accumulation is easily cleared by removing the lens from the body. The lens is removed by turning its 7/16" hex center hub 45° counter-clockwise
with a standard socket wrench. To reinstall the lens, simply reverse the process. Pressure must be relieved from the system prior to sensor clean-out. O-rings should be lubricated prior to re-assembly.
Low Flow Applications
A low flow adapter is supplied with all Rotorflow® units. It is used to produce accurate response at low flow rates. Install the adapter as shown above, in the port selected for incoming flow.
Panel Mounting Plastic Bodies.
Two (2) mounting ears are provided at the body center line to receive #8 self-tapping screws to accommodate panel mounting of the plastic RotorFlow® units. Note: ANSI T type 23 self-tapping screws are recommended. They may be replaced with standard
machine screws if re-installation should be required.
Brass and Stainless Steel Bodies
Two (2) mounting holes are provided on the body centerline, as shown below. #8-32UNC-2B screws are required for mounting.


 SEARCH OUR RESOURCE CENTER


